
Valentine’s Day is just around the corner, and I couldn’t be more excited to add a little love to my home! For me, there’s something so magical about creating your own decorations—it makes the space feel extra special. Whether you’re hosting a romantic dinner, celebrating with friends, or simply sprucing up your home, these 10 creative DIY Valentine’s Day decorations are the perfect way to set the mood without spending a fortune. Let’s dive in!

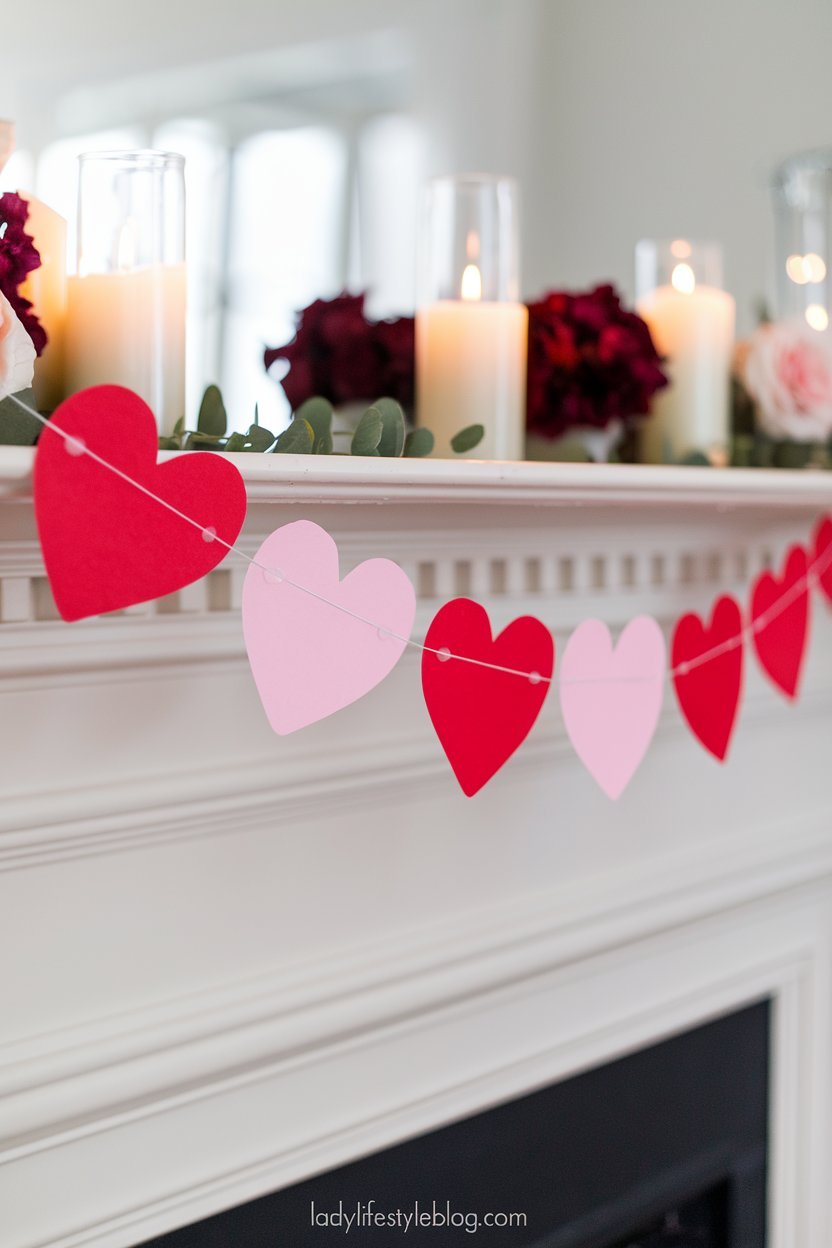
Heart Garland
What You Might Need:
- Red, pink, and white cardstock
- Scissors
- String or twine
- Glue or tape
How to Make It:
- Cut out multiple heart shapes in varying sizes from your cardstock.
- Arrange the hearts in a pattern you like (e.g., alternating colors and sizes).
- Attach the hearts to the string or twine using glue or tape, spacing them evenly.
- Hang your garland across a mantle, doorway, or wall for instant Valentine’s vibes.

source: Dupe
Pro Tip: Instead of cutting hearts by hand, use a heart-shaped paper punch to get perfect shapes every time. If you want a more sophisticated look, try layering lace or fabric hearts over cardstock.
Budget-Friendly Hack: Instead of buying new cardstock, repurpose old greeting cards or magazine pages with romantic prints.
Material Swap: No string or twine? Use fishing line for an almost invisible floating effect.
Picture This:
Imagine a delicate string of hearts gently swaying across your fireplace, adding a touch of romance to your cozy living room. It’s like a scene from a rom-com!
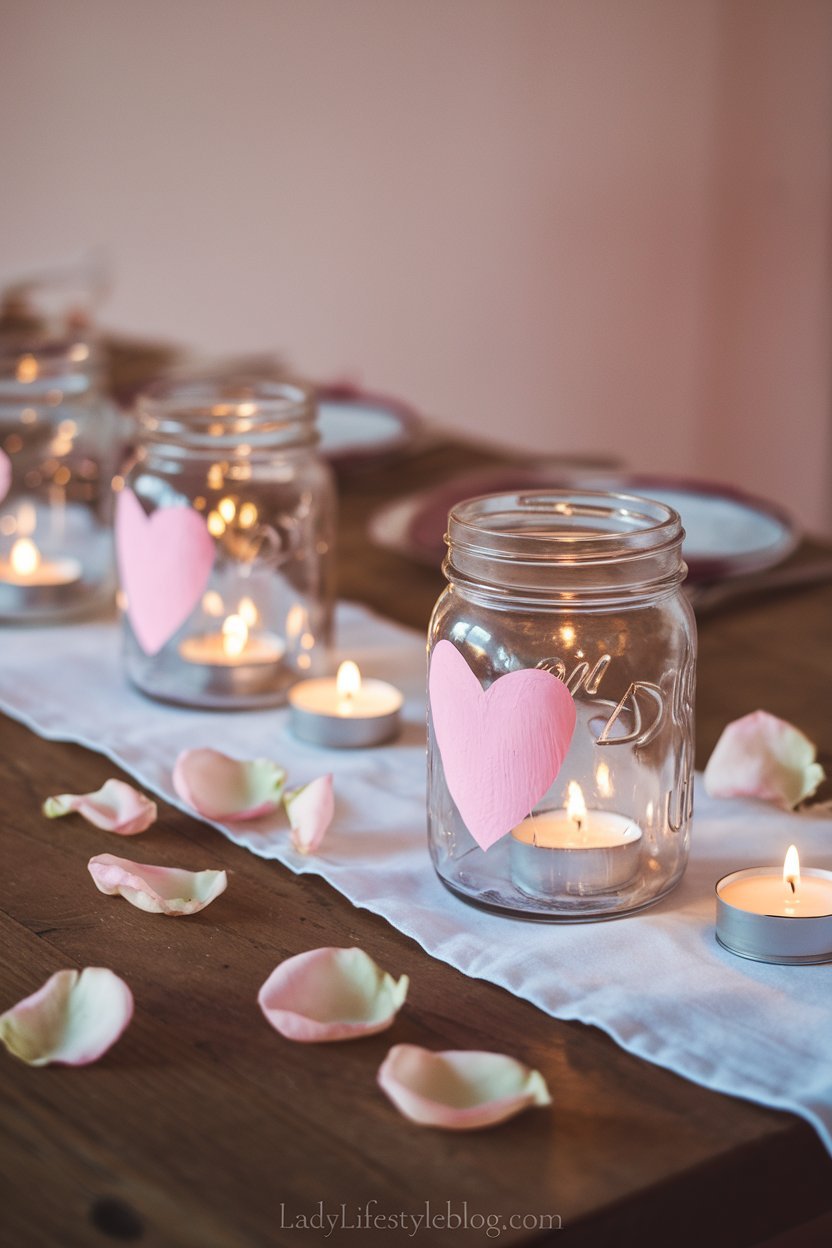
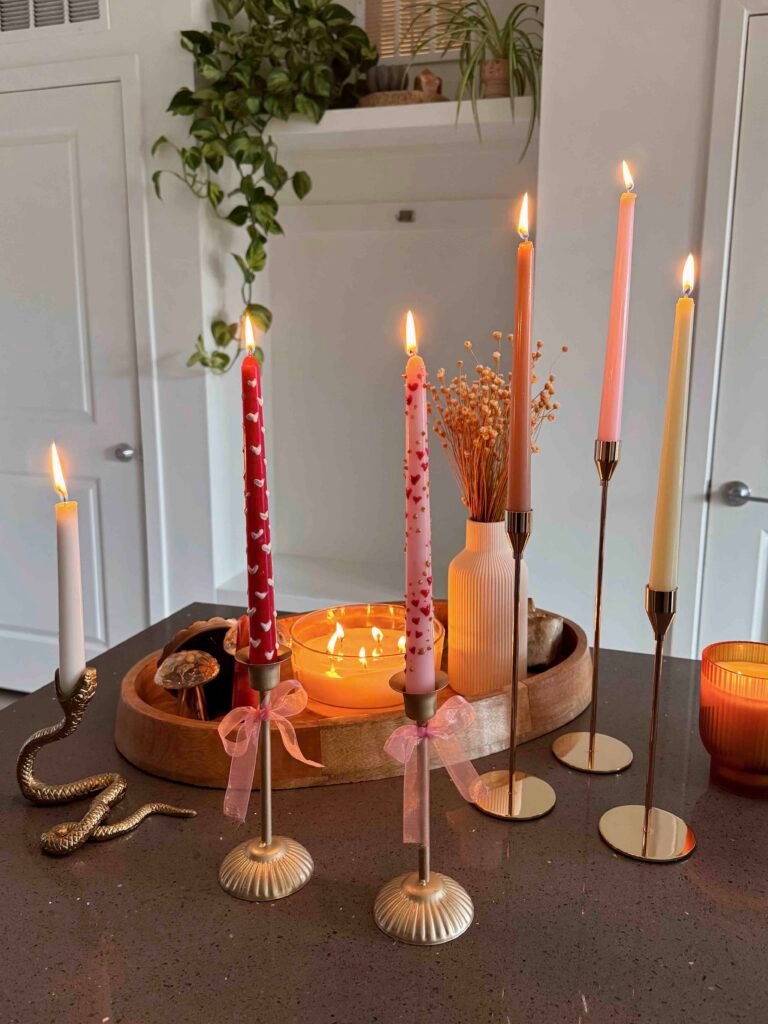
Mason Jar Candle Holders
What You Might Need:
- Mason jars
- Red or pink spray paint
- Heart-shaped stickers
- Tealight candles
How to Make It:
- Place heart-shaped stickers on the outside of your mason jars.
- Spray paint the jars in your desired Valentine’s color.
- Once the paint dries, peel off the stickers to reveal heart-shaped cutouts.
- Add tealight candles inside and watch your jars glow beautifully.
Pro Tip: For a frosted effect, use a light coat of Mod Podge mixed with fine glitter. This will give the jars a soft, romantic glow when the candlelight shines through.
Budget-Friendly Hack: Instead of spray paint, use acrylic paint to create a similar effect. Just apply multiple coats and seal with a clear varnish.
Material Swap: No mason jars? Use empty pasta sauce or jam jars instead!
Picture This:
Soft, warm candlelight flickers through the heart-shaped windows, creating a romantic ambiance on your dinner table. It’s the kind of glow that makes everything feel cozier.
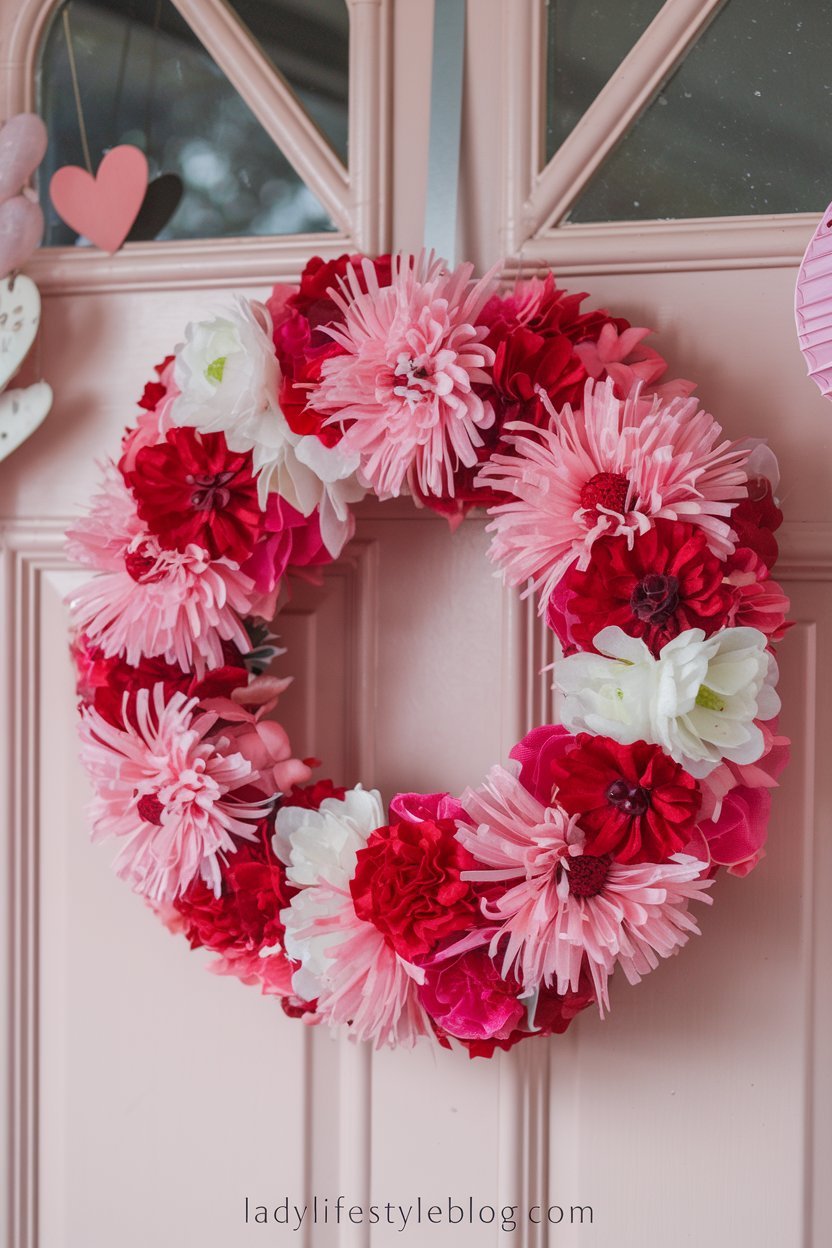
Valentine’s Wreath
What You Might Need:
- Wire wreath frame
- Faux flowers in pink, red, and white
- Ribbon
- Hot glue gun
How to Make It:
- Attach faux flowers to your wreath frame using a hot glue gun, layering them to create fullness.
- Add a bow made from ribbon to the top or bottom of the wreath.
- Hang the wreath on your front door or above your mantle.
Pro Tip: Add fairy lights around your wreath for an extra magical touch, especially if you’re hanging it indoors.
Budget-Friendly Hack: Instead of buying new faux flowers for your wreath, repurpose old floral arrangements or thrift store finds! Check out dollar stores for faux flowers and ribbons—you can often find great deals on seasonal items.
Material Swap: Instead of a wire wreath frame, use a sturdy piece of cardboard cut into a ring shape. Wrap it with fabric or twine for a rustic look.
Picture This:
A gorgeous floral wreath bursts with Valentine’s colors, greeting everyone with love as they walk through your door. It’s the perfect welcome.
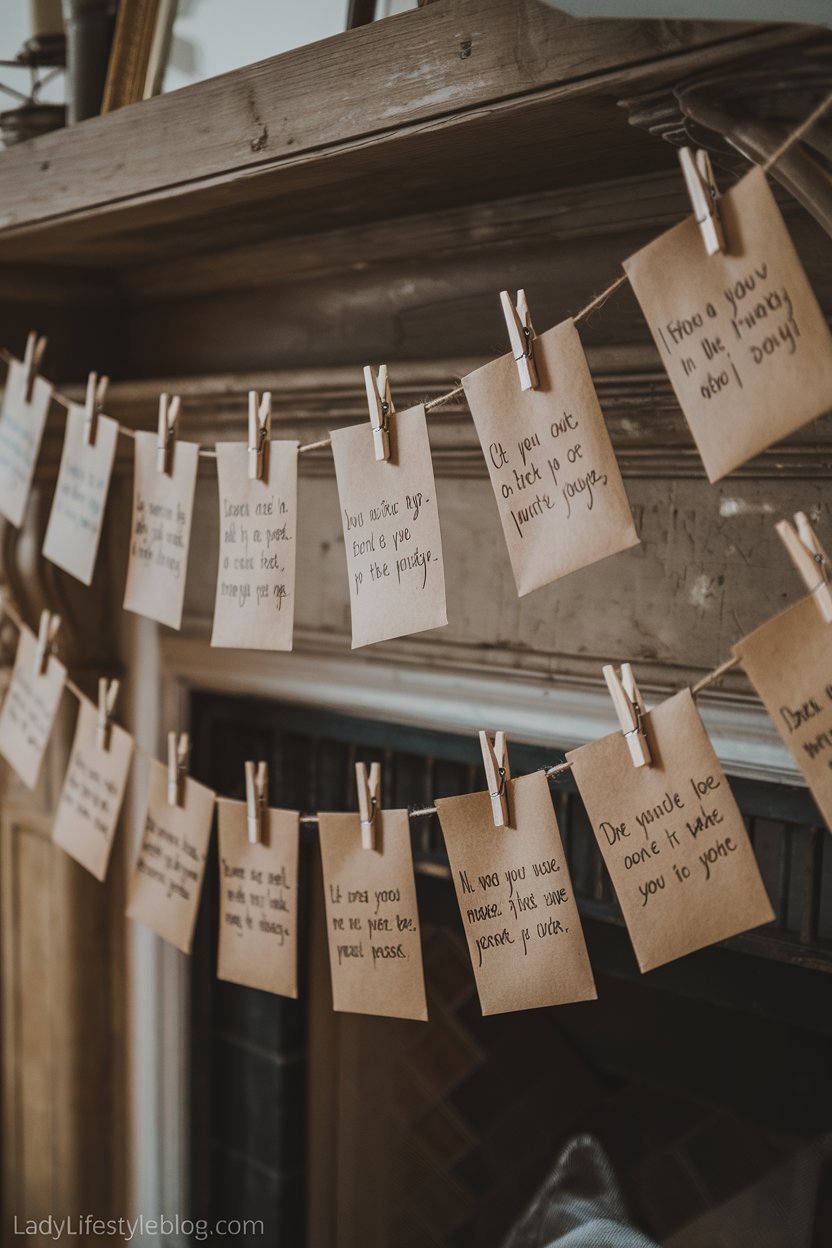
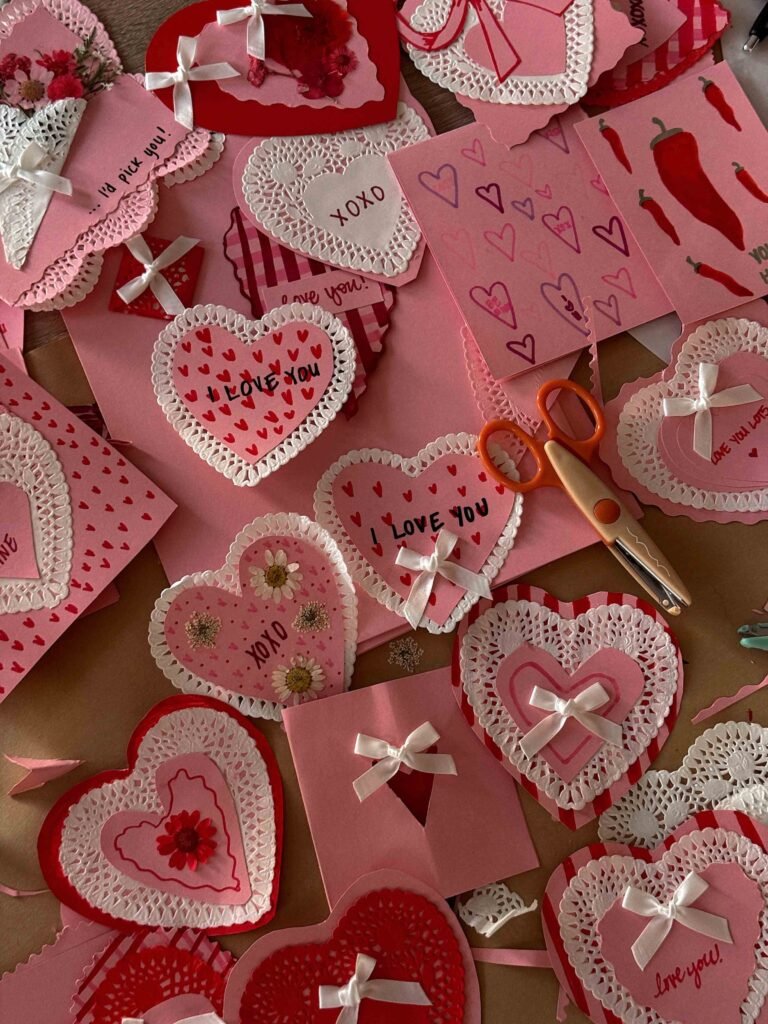
Love Letter Banner
What You Might Need:
- Kraft paper or envelopes
- Twine
- Markers or calligraphy pens
- Mini clothespins
How to Make It:
- Write sweet messages or love notes on pieces of kraft paper or inside envelopes.
- Attach each note to a piece of twine using mini clothespins.
- Hang the banner above a fireplace, across a wall, or in an entryway.
Pro Tip: Spray a light mist of perfume on the notes for an extra romantic and sensory experience.
Budget-Friendly Hack: Use scrap paper, old envelopes, or even brown paper bags to create a charming vintage-style banner.
Material Swap: If you don’t have twine, try using ribbon, yarn, or even strips of fabric for a softer look.
Picture This:
A rustic banner displaying heartfelt messages and love notes adds a personal, romantic touch to your living space. It’s like a little love story on display.
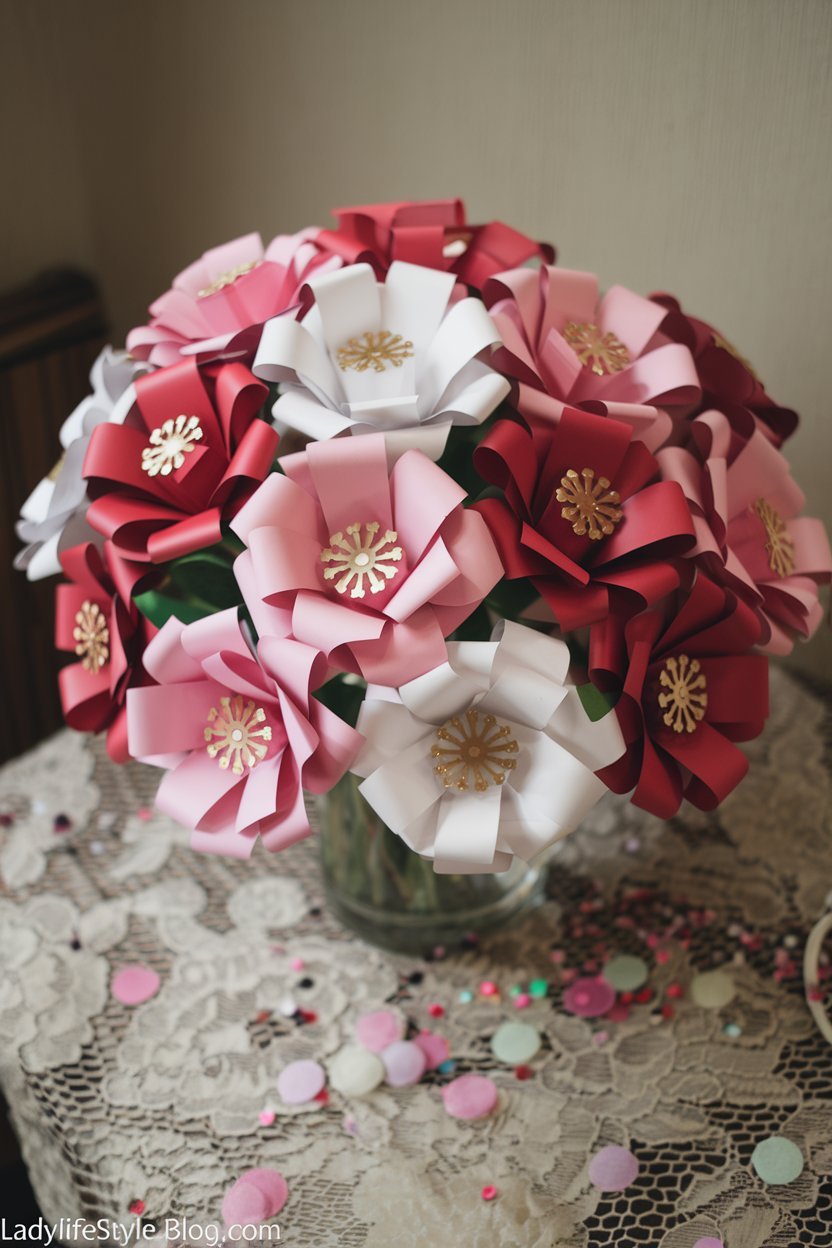
Paper Flower Bouquet
What You Might Need:
- Colored paper (pink, red, white)
- Scissors
- Floral wire
- Hot glue gun
- Vase
How to Make It:
- Cut paper into petal shapes and curl the edges slightly for a realistic look.
- Attach the petals to floral wire using a hot glue gun, layering them to form flowers.
- Arrange your flowers in a vase for a long-lasting Valentine’s bouquet.
Pro Tip: Use the edge of scissors to curl the petal edges slightly, making them look more natural and lifelike.
Budget-Friendly Hack: Instead of floral wire, use BBQ skewers or even pipe cleaners to make stems.
Material Swap: No colored paper? Use pages from an old book or newspaper for a chic, vintage-style bouquet.
Picture This:
A bouquet of beautifully crafted paper flowers sits on your dining table, adding charm and whimsy to your Valentine’s setting.
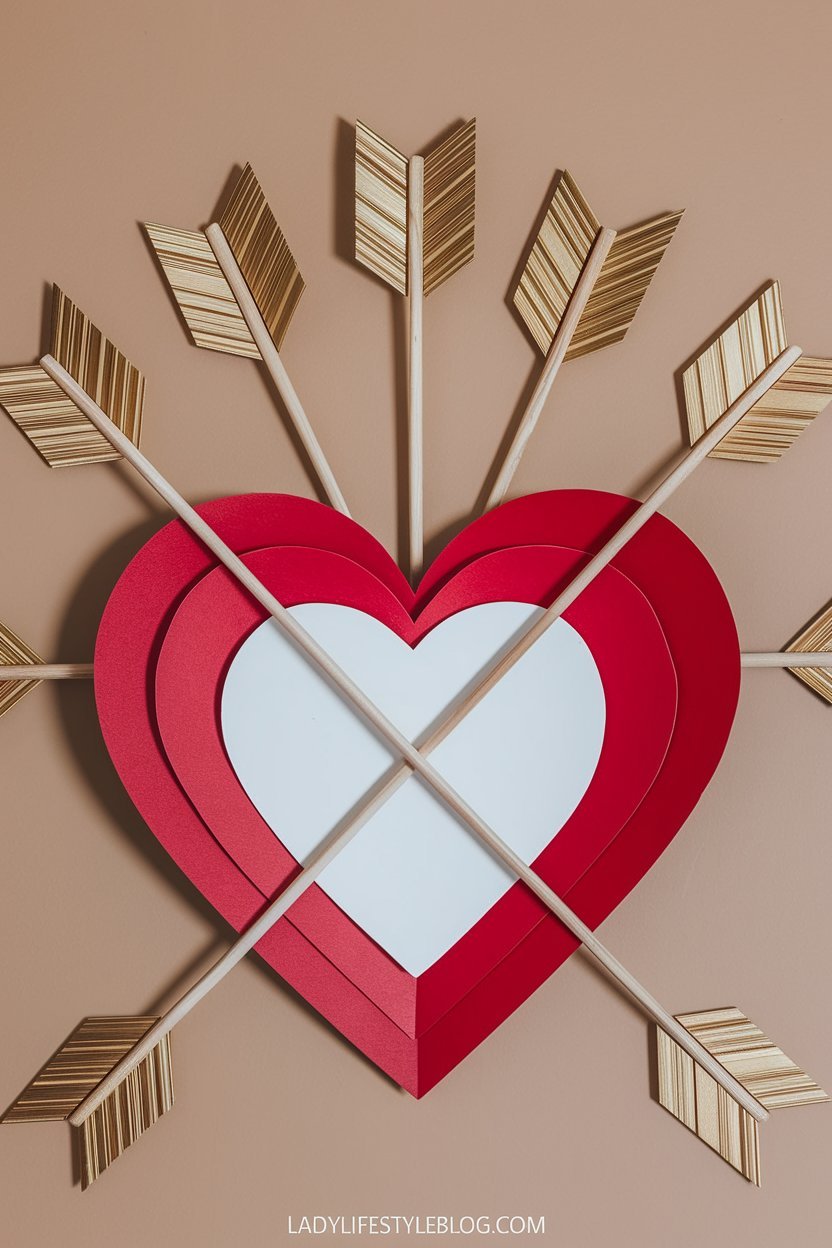
Cupid’s Arrow Wall Art
What You Might Need:
- Wooden skewers or dowels
- Gold or silver paint
- Cardstock
- Hot glue gun
How to Make It:
- Paint wooden skewers or dowels in metallic colors.
- Cut heart shapes and arrow fletching from cardstock.
- Attach the hearts and fletching to each end of the skewers to form arrows.
- Arrange and mount the arrows on your wall in a playful pattern.
Pro Tip: Arrange the arrows in a heart shape on the wall for a creative twist!
Budget-Friendly Hack: Skip the hot glue and use washi tape to attach the arrows to the wall—this makes it easier to remove later.
Material Swap: Instead of wooden skewers, use straight drinking straws for a lightweight, kid-friendly version.
Picture This:
Golden arrows seemingly shot by Cupid himself adorn your wall, creating a fun and festive display. It’s perfect for photos!
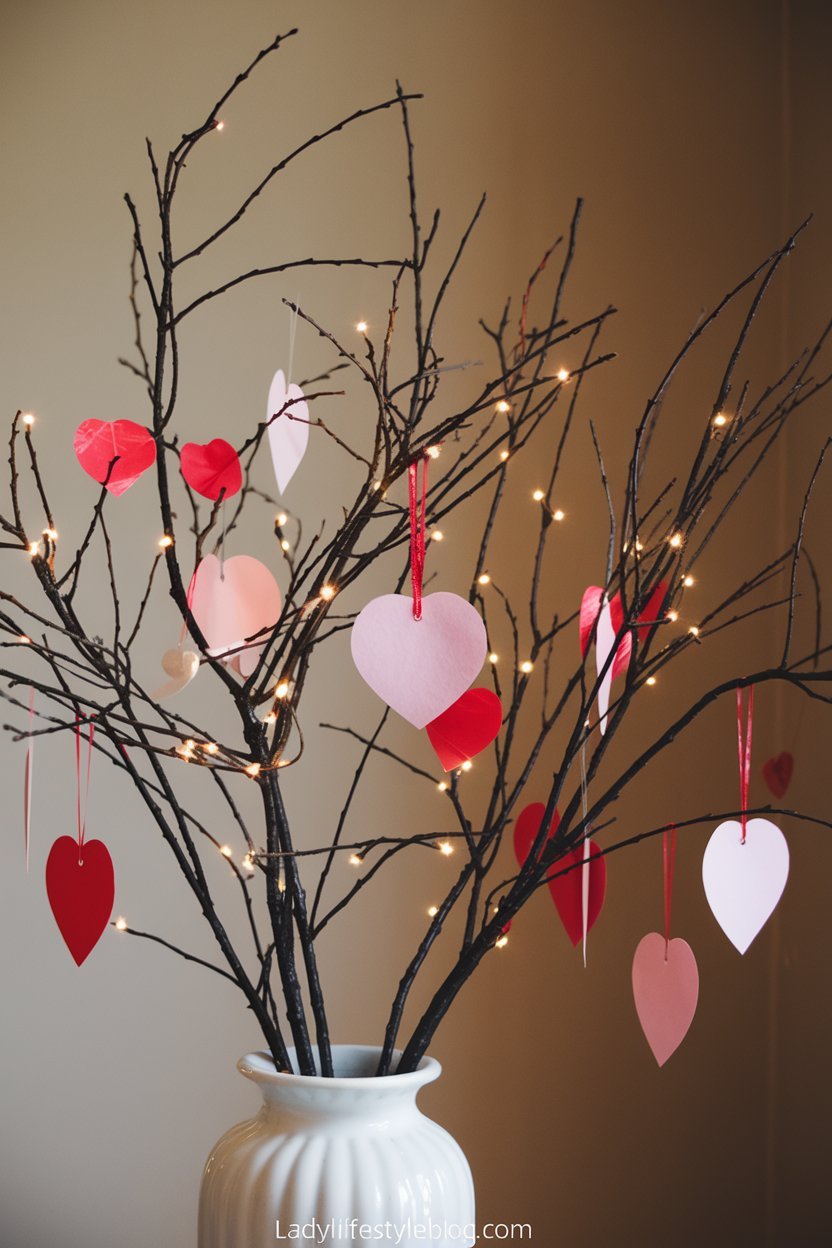
Valentine’s Day Tree
What You Might Need:
- Bare tree branches
- Red and pink ornaments or heart cutouts
- Vase or pot
- String lights (optional)
How to Make It:
- Place bare branches in a vase or pot to create a small tree.
- Decorate the branches with heart-shaped ornaments or paper cutouts.
- Add string lights for an extra magical touch.
Pro Tip: Wrap battery-operated fairy lights around the branches for a cozy, twinkling effect.
Budget-Friendly Hack: Use real tree branches from your yard or a park instead of buying artificial ones.
Material Swap: If you don’t have heart-shaped ornaments, cut out hearts from felt, paper, or even fabric scraps and tie them on with string.
Picture This:
A whimsical Valentine’s tree sits in the corner of your room, sparkling with lights and love-themed ornaments.
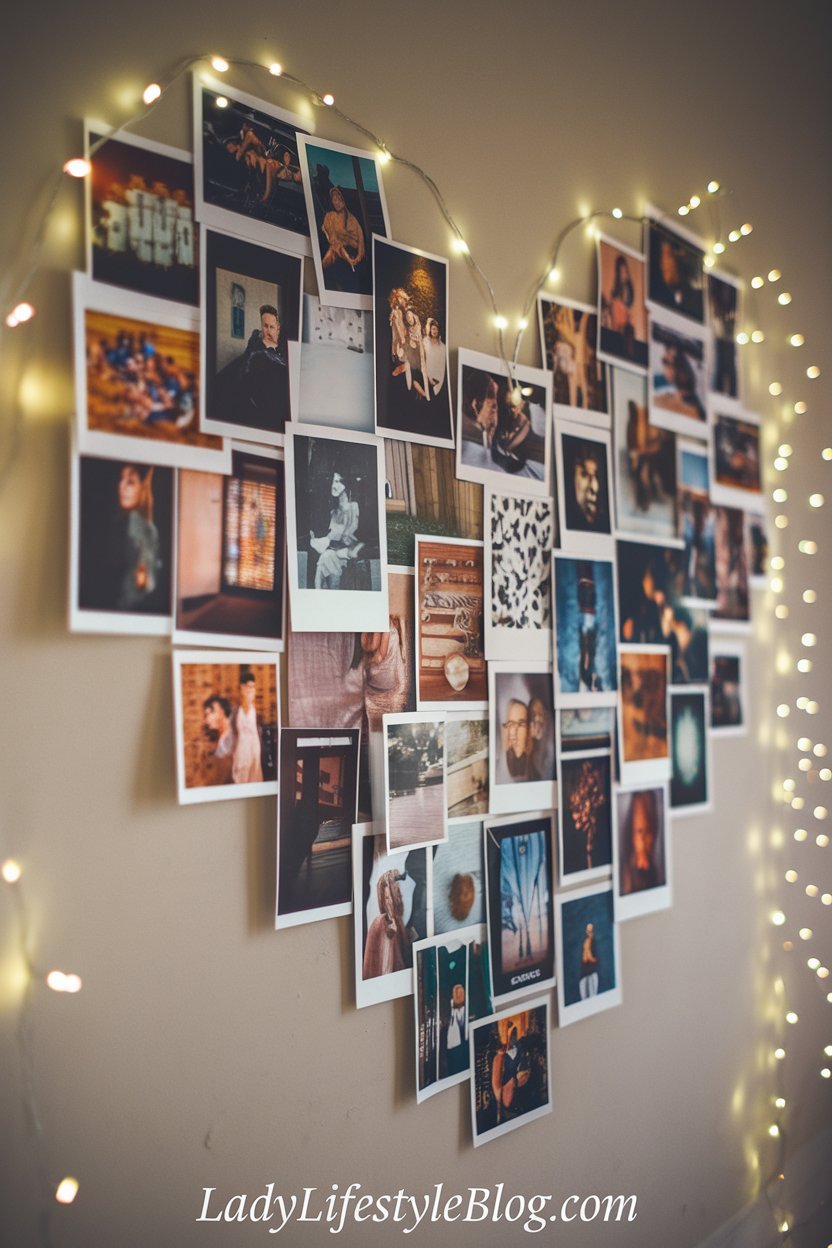
Heart-Shaped Photo Collage
What You Might Need:
- Printed photos
- Tape or adhesive putty
- Scissors (optional)
How to Make It:
- Print out your favorite photos of loved ones.
- Arrange the photos on a wall in the shape of a heart.
- Use tape or adhesive putty to secure the photos in place.
Pro Tip: Outline the heart shape with LED string lights for a stunning glowing effect at night.
Budget-Friendly Hack: Print photos at home on regular printer paper and use Mod Podge to give them a glossy, professional finish.
Material Swap: No adhesive putty? Use painter’s tape or washi tape to avoid damaging your walls.
Picture This:
A heart-shaped collage of precious memories adorns your wall, showcasing the love and joy in your life. It’s a daily reminder of what matters most.
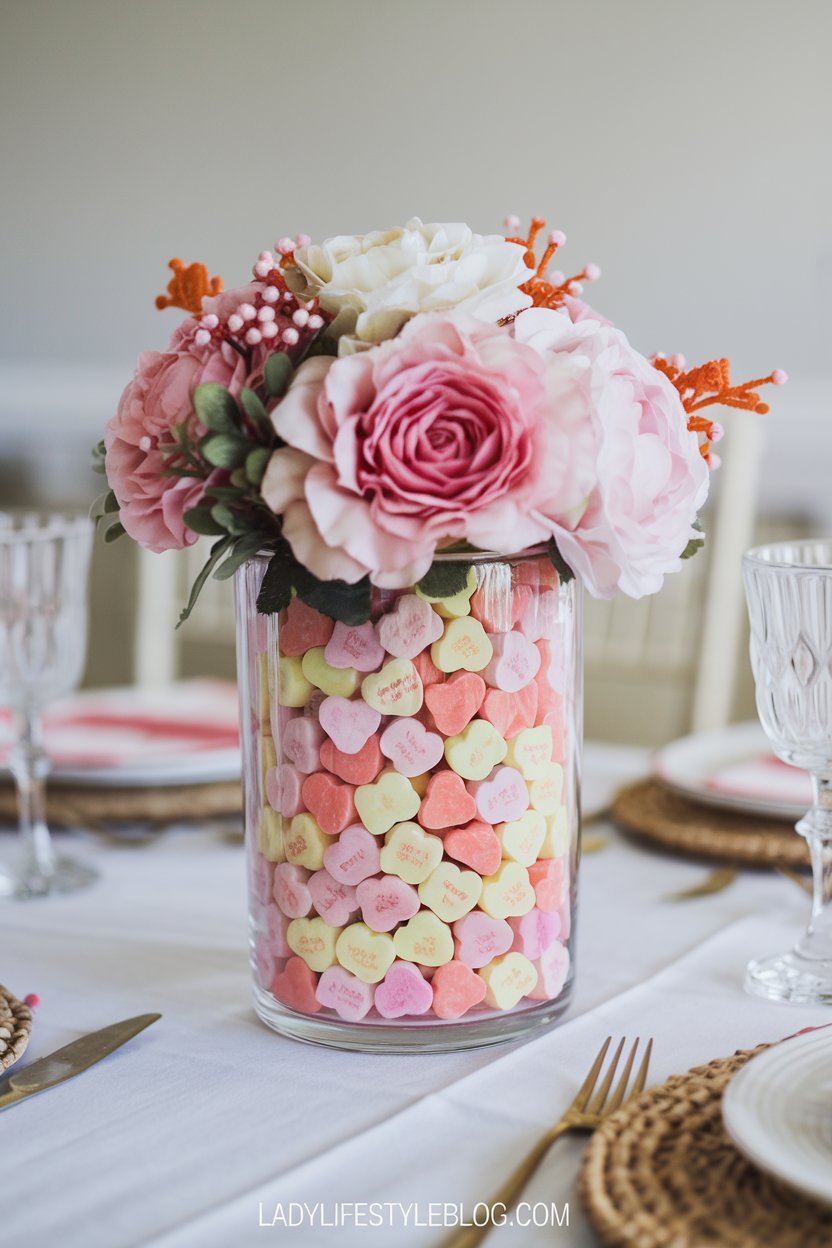
Candy Heart Centerpiece
What You Might Need:
- Clear glass vase or jar
- Conversation heart candies
- Faux flowers
How to Make It:
- Fill a clear glass vase or jar with layers of conversation heart candies.
- Add faux flowers to the vase, arranging them as a centerpiece.
Pro Tip: Place a smaller vase inside your main vase before adding the candy—it keeps the candy in place and allows you to reuse them later!
Budget-Friendly Hack: Instead of buying conversation hearts, use jelly beans, M&Ms, or any colorful candy.
Material Swap: No clear vase? Use a decorative bowl or even a wine glass for a unique twist.
Picture This:
A colorful vase filled with candies and flowers takes center stage on your table, adding sweetness to your Valentine’s Day.
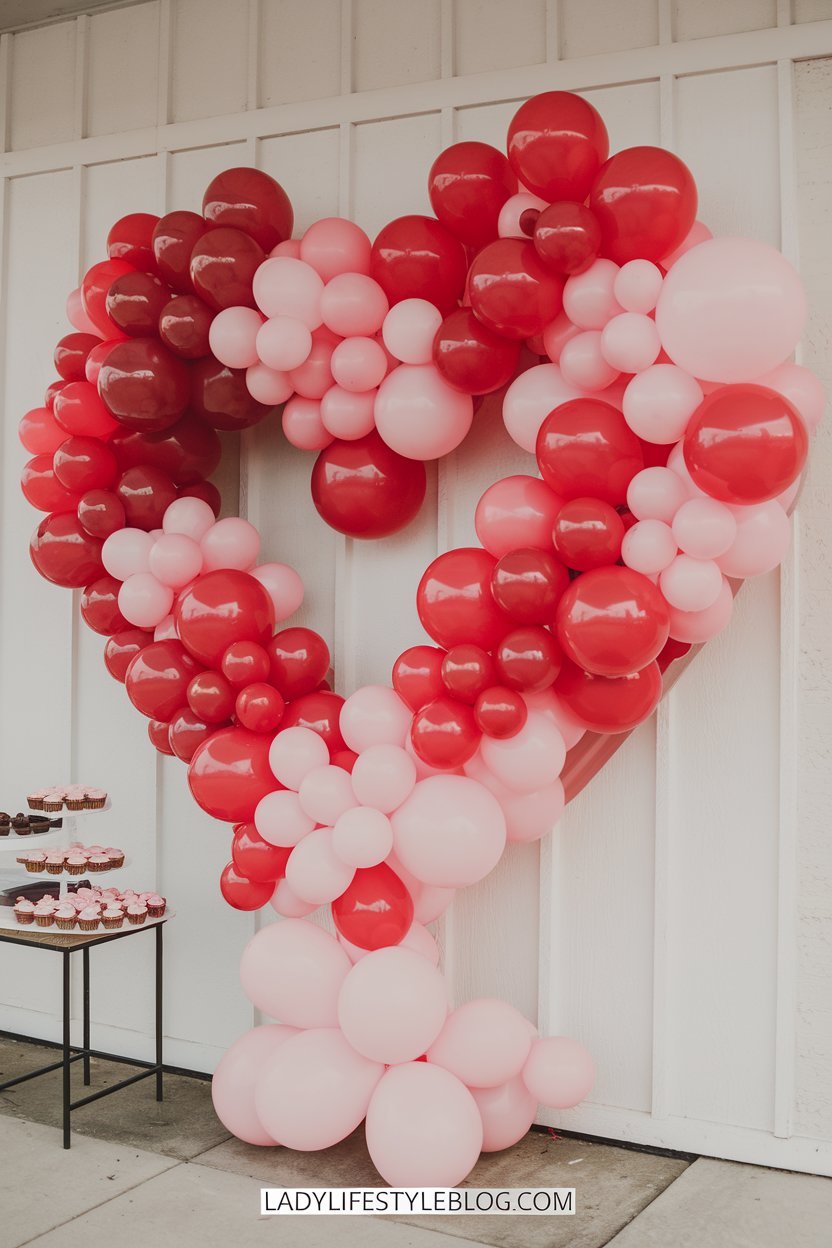
Balloon Heart Backdrop
What You Might Need:
- Red and pink balloons
- Balloon pump
- Adhesive hooks or tape
How to Make It:
- Inflate balloons in varying sizes and arrange them in the shape of a heart on your wall.
- Use adhesive hooks or tape to secure the balloons in place.
Pro Tip: Use a mix of matte, metallic, and transparent balloons to add depth and texture to your heart-shaped backdrop.
Budget-Friendly Hack: Instead of expensive helium balloons, use regular balloons and tape them to the wall in a heart shape.
Material Swap: No balloons? Use tissue paper pom-poms or cut-out paper hearts for a similar effect.
Picture This:
A giant heart-shaped balloon display serves as the perfect backdrop for Valentine’s photos and celebrations. It’s Insta-worthy and fun!
Conclusion
I’ve realized that crafting is more than just creating decorations—it’s about adding personal touches that make Valentine’s Day truly special. With these 10 creative DIY Valentine’s Day decorations, you can transform your space into a heartfelt haven. Each project is fun, easy, and budget-friendly, perfect for setting the mood. Whether you’re crafting a garland, glowing mason jar, or whimsical Valentine’s tree, I hope these ideas inspire you to celebrate love in style. Grab your crafting supplies and start creating memories with these DIY Valentine’s Day decorations!

At Lady Lifestyle Blog, I use AI as a tool to assist with research, idea generation, and content refinement. While much of my content is shaped with AI’s help, I personally review and adjust each post to ensure it aligns with the blog’s style and purpose. My focus is on providing stylish, creative, and practical inspiration for every modern lady!